

This lesson is made with PSPX9
But is good with other versions.
© by SvC-Design

Materialen Download :
Here
******************************************************************
Materials:
deco_Cloclo.png
deco_Cloclo1.png
deco2_Cloclo.png
deco3_Cloclo.png
deco4_Cloclo.png
ecole_Cloclo.png
enfant_Cloclo.png
enfant1_Cloclo.png
fond1.jpg
Narah_mask_0683.jpg
Narah_mask_0892.jpg
Watermark_Pour tuto.png
******************************************************************
Plugin:
Effects - plugin - < I.C.Net software - Filters Unlimited 2.0 - &<Bkg Designer sf 10II> - Flutter
Effects - plugin - < I.C.Net software > Filters Unlimited 2.0 - Two Moon - Cut Glass...
Effects - plugin - < I.C.Net software - Filters Unlimited 2.0 - <Two Moon> - VerticalChopBlur
Effects - plugin - MuRa's Filter Meister - Perspective Tiling 1.1
Effects - plugin - Graphics Plus - Cross Shadow
Effects - plugin - < I.C.Net software > Filters Unlimited 2.0 - &<BkgDesigner sf10III> - SE Shiver
******************************************************************
color palette
:

******************************************************************
methode
When using other tubes and colors, the mixing mode and / or layer coverage may differ
******************************************************************
General Preparations:
First install your filters for your PSP!
Masks: Save to your mask folder in PSP, unless noted otherwise
Texture & Pattern: Save to your Texture Folder in PSP
Selections: Save to your folder Selections in PSP
Open your tubes in PSP
******************************************************************
We will start - Have fun!
Remember to save your work on a regular basis
******************************************************************
1.
Foreground color : Color 1
Background :color 2
Open fond1.jpg
Window - duplicate
Minimize the original - we are working on the copy
Effects - Image Effects - Seamless Tiling - Default
Adjust - blur - gaussian blur
Radius at 20
Layers - Duplicate
2.
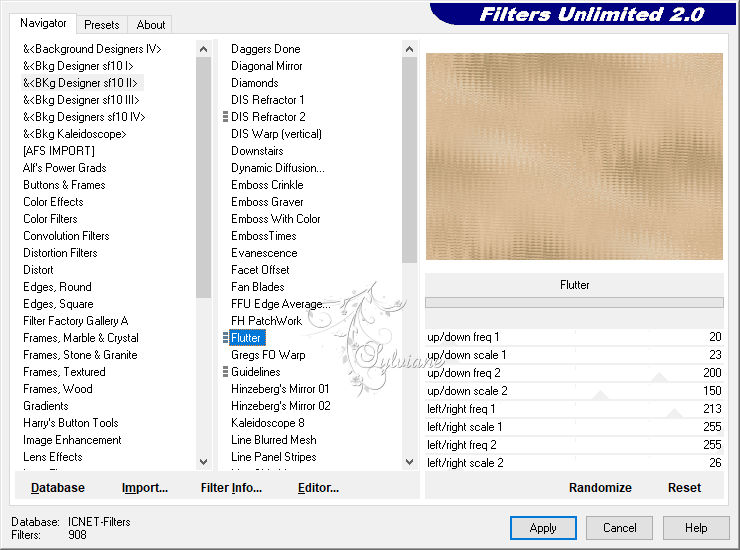
Effects - plugin - < I.C.Net software - Filters Unlimited 2.0 - &<Bkg Designer sf 10II> - Flutter
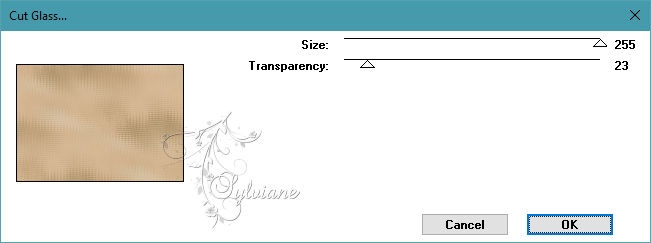
Effects - plugin - < I.C.Net software > Filters Unlimited 2.0 - Two Moon - Cut Glass...
3.
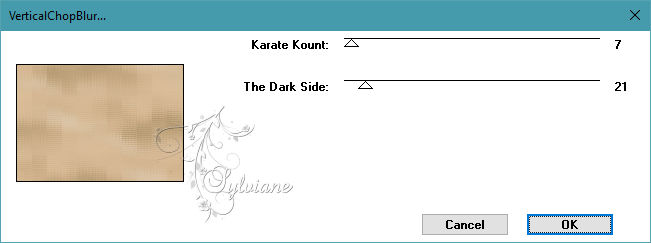
Effects - plugin - < I.C.Net software - Filters Unlimited 2.0 - <Two Moon> - VerticalChopBlur
Effects - Edge Effects - Enhance
Blend Mode: Soft Light
Layer – merge – merge all (flatten)
Layers - New raster layer
Fill with color1
4.
Open mask Narah_mask_0683
Layers - New mask layer from image - Mask Narah_mask_0683

Layers - Merge - Merge Group
opacity :45%
Effects - Image Effects - Seamless Tiling

5.
Layers - New raster layer
Fill with color 2
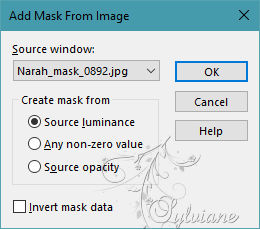
Open mask Narah_mask_0892
Layers - New mask layer - From image -
Narah_mask_0892
Layers - Merge - Merge Group
Effects - 3D effects - Drop shadow
2 / 2 /40 / 5 - Color 1
Adjust – scharpness – scharpen more
6.
Position on bottom layer
Layers - Duplicate
Layers – arrange – bring to top
Effects - plugin - MuRa's Filter Meister - Perspective Tiling 1.1
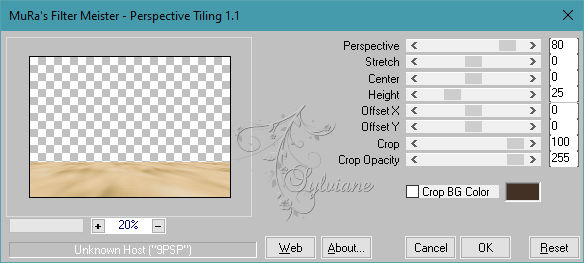
Adjust – scharpness – scharpen
With magic wand - Tolerance 0 - Progressivity 60

Click in the transparent area

Press the Delete key on the keyboard 6 times.
Selection - Select None
Effects - 3 D Effects - Drop Shadow
20 / 20 /40 / 55 - color:#000000
Open deco_Cloclo.png
Edit - copy
Edit - paste as new layer
Do not move
7.
Open ecole_Cloclo.png
Edit - Copy
Edit - paste as new layer
Objects – aligin – top
Open deco_Cloclo1.png
Edit - Copy
Edit - paste as new layer
Activate selection tool (Press K on your keyboard)
And enter the following parameters:
Pos X : -16 – Pos Y : 27
Press M.
Blend Mode : luminance (legacy)
Effects - 3D effects - Drop shadow
20 / 20 /40 / 55 - color:#000000
Image - Add Borders – symmetric - 1 pixel - Color 1
Selections - Select all
8.
Image - Add Borders – symmetric - 4 pixel - Color 3
Effects - Texture Effects - Tiles
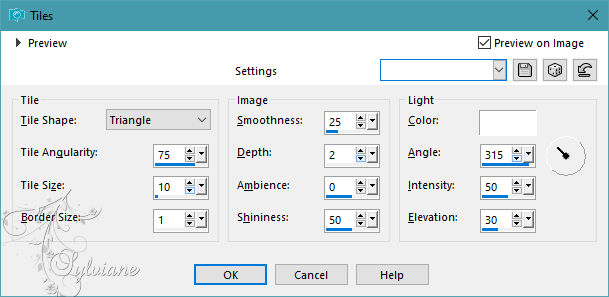
Selection - Select None
9.
Image - Add Borders – symmetric - 1-pixel - Color 1
Image - Add Borders – symmetric - 4 pixel - Color 2
Selections - Select all
Image - Add Borders – symmetric - 45-pixel color: Neutral
Selections - Invert
Preparing a gradient Linear
Color 1 foreground - Color 2 background

Fill gradient
10.
Selections - Invert
Effects - 3 D effects - Drop shadow
10 / 10 / 90 / 55 - Color 1
Selections - Invert
Selections – Promote selections to layer
Effects - plugin - Graphics Plus - Cross Shadow - Default
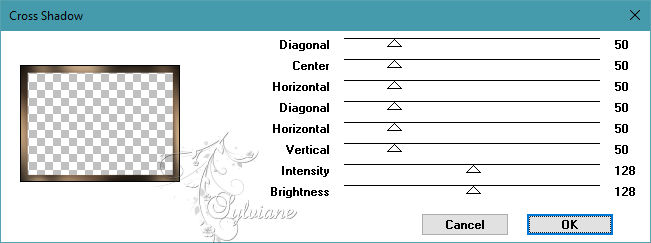
Effects - plugin - < I.C.Net software > Filters Unlimited 2.0 - &<BkgDesigner sf10III> - SE Shiver
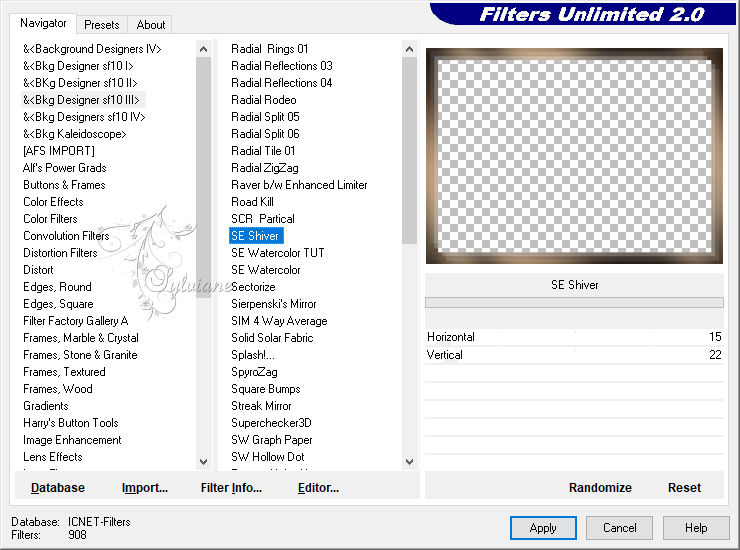
Effects - Edge Effects - Enhance More
Selection - Select None
11.
Image - Add Borders – symmetric - 1-pixel - Color 2
Open enfant_Cloclo.png
Edit - Copy
Edit - paste as new layer
Position well - Final view
Effects - 3 D effects - Drop shadow
2 / 2 / 55 / 20 - Color 1
Open enfant1_Cloclo.png
Edit - Copy
Edit - paste as new layer
Place bottom right - View final
Effects - 3 D Effects - Drop Shadow
2 / 2 / 55 / 20 - Color 1
Open deco2_Cloclo.png
Edit - Copy
Edit - paste as new layer
Position well - View final
Effects - 3 D effects - Drop shadow
2 / 2 / 55 / 20 - Color 1
Open deco3_Cloclo.png
Edit - Copy
Edit - paste as new layer
Place the tube at the top left or as you see fit
Effects - 3 D effects - Drop shadow
2 / 2 / 55 / 20 - Color 1
Open deco4_Cloclo.png
Edit - Copy
Edit - paste as new layer
Place the tube at the bottom left or as you see fit
Effects - 3 D effects - Drop shadow
2 / 2 / 55 / 20 - Color 1
12.
Sign your work - Put my watermark, Put your copyright if necessary
Resize to 1000 pixels wide
Save as JPG
Back
Copyright Translation 2023 by SvC-Design